

How to Customize Addressable LED Strip Light?
Addressable LED strip lights are one of the easiest ways to completely transform a room, gaming setup, desk, TV area, bedroom, or even a DIY electronics project. Unlike standard RGB strips, addressable LEDs allow you to control individual LEDs or small groups of LEDs independently.
That means one section of your strip can be red, another blue, another green, while animated effects move across the entire strip at the same time.
But customizing addressable LED strips properly involves more than simply sticking them to a wall and selecting a color.
What Are Addressable LED Strip Lights?
A regular RGB LED strip usually controls the entire strip as one unit.
If you select blue, the whole strip becomes blue.
Addressable LED strips work differently.
Each LED, or sometimes each small group of LEDs, contains its own control chip. This allows the controller to send individual instructions to different LEDs along the strip.
For example, you could create:
- A moving rainbow
- A chasing light effect
- Color waves
- Fire animations
- Music-reactive lighting
- Gradients
- Custom gaming effects
- Holiday lighting patterns
- Ambient TV lighting
This individual control is what makes addressable LEDs much more flexible than traditional RGB strips.
Common Types of Addressable LED Strips
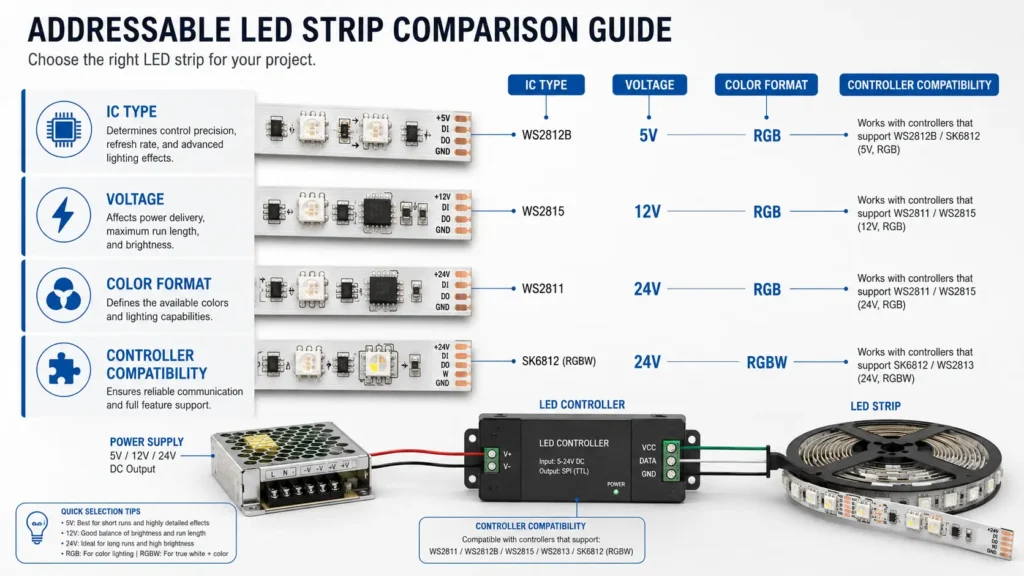
One of the most popular addressable LED strip types is WS2812B.
These strips are widely used because they are relatively inexpensive, easy to control, and supported by many LED controllers and software platforms.
Other common options include:
- WS2812B
A very popular 5-volt strip where each LED can usually be controlled individually.
It’s excellent for small and medium DIY projects.
- WS2815
WS2815 strips normally operate at 12 volts.
One advantage is that voltage drop can be less noticeable over longer installations compared with some 5-volt strips.
Many WS2815 strips also use a backup data line, which can improve reliability if one LED develops a problem.
- SK6812
SK6812 strips are similar to WS2812B strips, but some versions include an additional dedicated white LED channel.
These are commonly called RGBW strips.
RGBW can be a good choice when you want decorative RGB effects while also having more natural-looking white illumination.
- APA102
APA102 strips use separate data and clock signals.
They can achieve very fast refresh rates and are useful for certain advanced projects, although they are generally less common in basic home installations.
Choose the Correct Voltage
Before buying an LED strip, check its operating voltage.
The most common options are:
- 5V
- 12V
- 24V
Never assume that every LED strip uses the same voltage.
Connecting a 5V LED strip directly to a 12V power supply can permanently damage it.
A 12V strip connected to a 5V supply, on the other hand, may not operate correctly.
Always match the strip voltage with the power supply and controller specifications.
Understanding LED Density
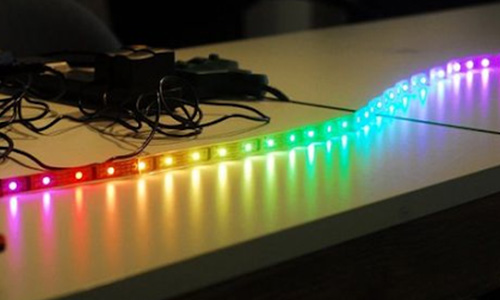
LED strips are available with different numbers of LEDs per meter.
Common configurations include:
- 30 LEDs per meter
- 60 LEDs per meter
- 96 LEDs per meter
- 120 LEDs per meter
- 144 LEDs per meter
Higher-density strips create smoother lighting effects because there are fewer visible gaps between LEDs.
However, they also consume more power.
For decorative room lighting, 30 or 60 LEDs per meter can often be sufficient.
For projects where the individual LEDs are clearly visible, such as desk lighting, signs, PC builds, or animations, higher-density strips can provide a more premium appearance.
Calculate Power Requirements
This is one of the most important parts of an LED installation.
Your power supply must be powerful enough to run the entire strip safely.
For example, imagine your LED strip can consume approximately 18 watts per meter at maximum brightness.
If you’re installing five meters:
18 watts × 5 meters = 90 watts
You shouldn’t normally choose a power supply that operates continuously at its absolute maximum rating.
Giving yourself some additional capacity is a good idea.
For a 90-watt theoretical load, something around 110 to 120 watts could provide useful headroom, depending on the system.
The actual consumption also depends on:
- LED model
- LED density
- Brightness
- Selected colors
- Animation
- Number of LEDs illuminated simultaneously
White at maximum brightness typically creates one of the highest power demands because the red, green, and blue channels may all be operating simultaneously.
Watch Out for Voltage Drop
Voltage drop is a very common problem with long LED strips.
You may notice that LEDs near the beginning of the strip look bright and white, while LEDs near the end become dimmer or slightly yellow, orange, or red.
This happens because the voltage decreases as current travels through the thin copper traces inside the strip.
The solution is called power injection.
Instead of powering a long strip only from one end, additional power wires are connected at other points along the strip.
For example, you might supply power at:
- The beginning
- The middle
- The end
The exact number of injection points depends on the voltage, strip length, wire size, LED density, and brightness.
Choosing a Controller
You need some type of controller to tell the LEDs what to do.
There are two main approaches.
Ready-Made LED Controller
For a simple installation, a Wi-Fi or Bluetooth LED controller is the easiest option.
You connect:
Power supply → Controller → LED strip
Then you control colors and effects using an app or remote control.
This is ideal if you want something simple and don’t want to write code.
Microcontroller
For advanced customization, you can use boards such as:
- ESP32
- ESP8266
- Arduino
An ESP32 is particularly popular because it includes Wi-Fi and Bluetooth and is powerful enough for many lighting projects.
Using a microcontroller gives you much more flexibility.
You can create custom animations, integrate the lights into smart-home systems, or synchronize them with other devices.
Using WLED
One of the easiest ways to customize addressable LED strips with an ESP32 or ESP8266 is WLED.
WLED is software designed specifically for controlling addressable LEDs.
It provides a web-based interface where you can control:
- Brightness
- Color
- Effects
- Animation speed
- Effect intensity
- LED segments
- Presets
- Timers
You can also divide one physical strip into multiple virtual sections.
For example, imagine you have LEDs installed around an entire gaming room.
You could configure:
LEDs 1–60 as the desk area.
LEDs 61–120 as the monitor area.
LEDs 121–200 as the shelf area.
Each section can then display a different color or animation.
How to Connect the LED Strip?
Most basic addressable LED strips have three main connections:
- Positive voltage
- Ground
- Data
Some strips have additional wires, but the basic principle is similar.
The controller sends digital information through the data wire.
One very important detail is direction.
Addressable LED strips normally have arrows printed on the PCB showing the direction that the data signal travels.
The controller must be connected to the input side.
If you connect the controller to the output side, the LEDs may not work.
The controller and LED strip should generally share a common ground connection.
Without a common ground, the data signal may become unstable.
Possible symptoms include:
- Random flashing
- Wrong colors
- Flickering
- Unresponsive LEDs
- Corrupted animations
Proper wiring often solves these issues immediately.
Install a Data Resistor
Many DIY LED installations use a small resistor in series with the data wire.
Something roughly in the 220- to 470-ohm range is commonly used depending on the setup.
It is normally installed near the LED strip’s data input.
The resistor can help reduce signal ringing and protect the first LED from certain electrical spikes.
Consider a Capacitor
A large capacitor across the power input can also help stabilize the system.
It is commonly installed between positive and ground near the beginning of the strip.
This can help absorb sudden voltage changes when the LEDs turn on.
The correct component selection depends on your particular installation, so always follow the controller and LED-strip manufacturer’s recommendations.
Customize Your Colors
Once everything is connected, you can start creating custom colors.
Addressable LEDs normally produce colors using red, green, and blue channels.
Different combinations create different colors.
For example:
Red + green = yellow
Red + blue = magenta
Green + blue = cyan
Red + green + blue = white
You don’t need to calculate these manually if you’re using an LED application.
Most apps provide a color wheel or RGB sliders.
Create Custom Segments
Segment control is one of the best features of addressable LEDs.
Suppose your strip contains 300 LEDs.
You could configure:
LEDs 1–100: blue
LEDs 101–200: purple animated effect
LEDs 201–300: warm orange
You can also give each section a completely different animation.
This makes one LED strip behave almost like several independent lighting systems.
Customize Animation Speed
Most effects have adjustable speed.
Slow animation works well for:
- Ambient bedroom lighting
- Relaxation
- Background lighting
- Living rooms
Fast animations work better for:
- Parties
- Gaming setups
- Music synchronization
- Decorative displays
Avoid making every effect extremely fast.
In many rooms, slower effects actually look more premium and less distracting.
Adjust Effect Intensity
Many controllers also allow you to change effect intensity.
Higher intensity may create larger, more dramatic color changes.
Lower intensity often produces smoother, more subtle animations.
Combining lower brightness with slower animation is particularly effective for ambient lighting.
Create a Smooth Gradient
Instead of using several completely different colors, try colors that are close together.
For example:
Dark blue → blue → purple → pink
This creates a smooth gradient rather than harsh transitions.
Gradients often look especially good behind:
- TVs
- Monitors
- Beds
- Shelves
- Desks
Music-Reactive Lighting
Some addressable LED controllers support audio-reactive effects.
The lights can respond to:
- Music volume
- Bass
- Frequency ranges
- Microphone input
This creates effects where LEDs pulse or move according to the music.
Some systems use a built-in microphone, while others require an external microphone module.
Music-reactive lighting is particularly popular in gaming rooms and entertainment spaces.
Mounting the LED Strip
Before sticking an LED strip to a surface, clean the area thoroughly.
Dust and grease can cause the adhesive backing to fail.
For a temporary installation, the factory adhesive may be sufficient.
For a permanent installation, aluminum LED channels are usually better.
An aluminum channel offers several advantages.
It provides:
- Better mounting
- Cleaner appearance
- Better heat dissipation
- Protection from physical damage
Most channels can also be fitted with a diffuser.
Why You Should Use a Diffuser?
A diffuser helps blend individual LED points into a smoother line of light.
Without a diffuser, you’ll often see separate bright dots.
With a diffuser, the lighting looks much more professional.
The effectiveness depends on the distance between the LEDs and the diffuser.
Higher-density LED strips usually produce smoother results.
Cutting the LED Strip
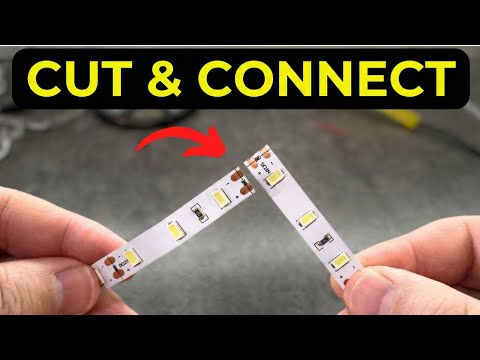
Addressable LED strips can usually be cut only at designated cutting points.
These points are typically marked with copper pads or scissors symbols.
Do not cut between the marked sections.
Doing so may damage one or more LEDs or make part of the strip unusable.
READ ALSO: Can you cut led strip lights?
Connecting Separate Sections
If you need to turn a corner or create separate sections, you have several options.
You can:
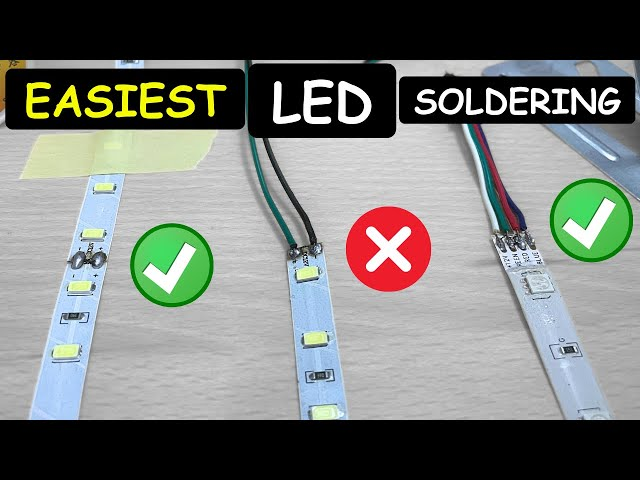
- Solder wires between strips
- Use LED strip connectors
- Use corner connectors
Soldering generally creates the most reliable connection.
Clip-on connectors are easier but can sometimes become loose or unreliable.
Installing Around Corners
Avoid sharply bending LED strips across electronic components.
For tight corners, it’s often better to cut the strip at an approved cutting point and reconnect the sections with short wires.
This reduces mechanical stress on the PCB.
Waterproof vs Non-Waterproof Strips
LED strips are available with different levels of environmental protection.
Non-waterproof strips are usually best for dry indoor environments.
Water-resistant or waterproof versions are better for:
- Kitchens
- Bathrooms
- Outdoor installations
- Vehicles
- Areas exposed to moisture
However, waterproof coatings can make strips harder to cut and solder.
They may also retain more heat.
Smart Home Integration
Addressable LED strips can also be integrated into smart-home systems.
Depending on your controller, you may be able to control the lights using:
- Home Assistant
- Amazon Alexa
- Google Home
- Apple Home systems
- MQTT
- Custom automation software
You could create routines such as:
Turn the LEDs warm white at sunset.
Switch to dim blue lighting at 11 PM.
Turn the strip red when an alarm is triggered.
Create a notification animation when someone rings the doorbell.
Best Uses for Addressable LED Strips
There are countless ways to use them.
Some of the most popular include:
Gaming Desk
Install the strip behind the desk or monitor.
A subtle blue-to-purple gradient can create an excellent gaming atmosphere.
TV Backlighting
LED strips placed behind a TV can reduce perceived eye strain in dark rooms while adding decorative lighting.
Advanced systems can even synchronize the lights with the colors displayed on the screen.
Bedroom Lighting
Install LEDs behind the headboard, under the bed, or along ceiling edges.
Slow-moving effects usually work better than fast animations for bedroom lighting.
Shelves
Addressable LEDs are excellent for displaying collectibles.
Different shelf sections can have different colors.
PC Lighting
LEDs can be integrated into computer cases, desks, and wall panels.
Holiday Decorations
You can create animations for:
- Christmas
- Halloween
- Birthdays
- Parties
Because individual LEDs are controllable, far more complex animations are possible than with standard decorative lights.
Common Problems and Solutions
LEDs Flicker Randomly
Possible causes include:
- Poor ground connection
- Long data wire
- Electrical interference
- Inadequate power supply
- Incorrect signal voltage
Check the wiring first.
End of the Strip Changes Color
This is usually caused by voltage drop.
Add power injection points.
Strip Doesn’t Turn On
Check:
- Power supply voltage
- Polarity
- Data direction
- Controller configuration
- Ground connection
Some LEDs Work and Others Don’t
A damaged LED can sometimes interrupt the data signal to LEDs farther down the strip.
Inspect the area where the lighting stops.
Colors Are Wrong
Your controller may be using the wrong color order.
For example, the strip may expect GRB while the software is configured for RGB.
Change the LED color-order setting.
How Bright Should Addressable LEDs Be?
Maximum brightness usually isn’t necessary.
Running LEDs at 100 percent brightness can:
- Increase power consumption
- Increase heat
- Increase voltage drop
- Make ambient lighting uncomfortable
For decorative indoor lighting, approximately 20 to 60 percent brightness is often enough.
The exact setting depends on the room and installation.
Advantages of Addressable LED Strips

Pros
- Individual LED control
Thousands of animation possibilities
Custom colors
Smart-home integration
Music synchronization
Flexible installation
Relatively affordable hardware
Excellent DIY potential

Cons
- Power requirements
Voltage drop
Data wiring
Controllers
Software configuration
Are Addressable LED Strips Worth It?
For most people interested in decorative lighting, gaming setups, smart homes, or DIY electronics, yes.
Standard RGB strips are perfectly adequate if you only want one solid color across the entire strip.
But addressable strips provide much more flexibility.
You can build sophisticated lighting effects using inexpensive hardware, and platforms such as WLED make customization accessible even if you don’t have much programming experience.
Final Review
Addressable LED strip lights are among the most versatile lighting products available for DIY projects.
Their biggest advantage is individual LED control.
Instead of turning an entire strip one color, you can create gradients, animations, moving patterns, music-reactive effects, and multiple independent lighting zones.
The key to a reliable installation is planning the electrical side correctly.
Choose the correct voltage, calculate the required power, use appropriate wiring, and add power injection for longer strips when necessary.
For beginners, a Wi-Fi controller offers the easiest setup.
For users who want considerably more control, an ESP32 combined with software such as WLED provides an excellent balance between customization and ease of use.
Once properly installed, addressable LED strips can turn an ordinary desk, room, TV setup, shelf, or gaming area into a highly customizable lighting system.
Overall, they are an excellent choice for anyone who wants more than simple static RGB lighting.